Exercise 3: FXML and Events
Overview
In this exercise, you will build a small JavaFX interface using FXML and Scene Builder. The application will let the user change the color of a rectangle in several different ways.
You will practice working with three kinds of events:
- Action events from buttons
- Mouse events from interacting with the rectangle
- Keyboard events from pressing keys
You will also use a small amount of JavaFX CSS to change the appearance of the rectangle when the mouse enters and leaves it.
Your project already includes a driver class that loads exercise3.fxml. You will create the FXML interface and complete the controller.
Solution Reference
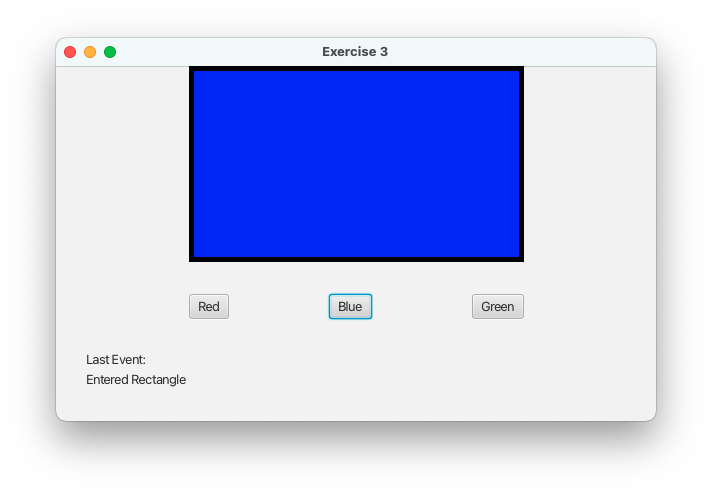
Use this screenshot as a reference while creating your interface in Scene Builder.
1. Create the FXML File
Create a new FXML file named:
exercise3.fxmlOpen the file in Scene Builder.
Use the screenshot of the completed solution at the top of this assignment as a visual reference when building your interface in Scene Builder. Your layout does not need to match it pixel-for-pixel, but it should contain the same controls and support the same interactions.
Your interface must contain the following controls:
- A
Rectanglethat will display the current color - A
Labelthat will describe some of the events that occur - A button for Red
- A button for Blue
- A button for Green
Make the rectangle:
330pixels wide- Large enough to clearly display its color
Arrange the controls so the application is easy to use.
2. Connect the FXML File to the Controller
Create a controller class named Controller in the package used for this exercise.
In Scene Builder, select the root element of the interface and set its controller class to your Controller class.
For example, if your controller is in the package exercises.week3, the controller name would be:
exercises.week3.ControllerRemember that the controller class is what allows the objects created from the FXML file to interact with your Java code.
3. Give the Rectangle and Label fx:id Values
Your controller will need direct access to the rectangle and the label.
In Scene Builder, assign these fx:id values:
| Control | fx:id |
|---|---|
| Rectangle | colorArea |
| Label | resultLabel |
Add matching fields to the controller:
@FXML private Rectangle colorArea;
@FXML private Label resultLabel;
Be sure to import the appropriate JavaFX classes.
The button controls do not need fx:id values because the controller does not need to directly access the button objects.
4. Add the Red, Blue, and Green Action Handlers
The first three buttons will use Action Events.
Create three controller methods named:
red
blue
green
Each method should:
- Change the fill color of
colorAreato the corresponding JavaFXColorconstant. - Change the text of
resultLabelto describe which button was clicked.
Changing the Fill of a Shape
A JavaFX Rectangle is a Shape. The inside color of a shape is called its fill. JavaFX shapes provide the setFill method for changing that color.
For example:
colorArea.setFill(Color.RED);Here, colorArea is the Rectangle, and Color.RED is a predefined JavaFX Color object. Calling setFill replaces the rectangle's current interior color with the color you provide.
You can use other predefined colors in the same way, such as:
Color.BLUE
Color.GREEN
Later in the exercise, you will also pass a custom Color object to setFill.
Use these exact label messages:
Clicked Red Button
Clicked Blue Button
Clicked Green Button
Because these handlers do not need any information from the ActionEvent object, do not add an ActionEvent parameter to the methods.
In Scene Builder, connect each button's On Action property to the appropriate controller method.
5. Create a Random Color Method
Create another handler named:
randomLater, the Enter key will change the rectangle to a randomly generated color. To avoid putting the random-color logic directly inside the keyboard event handler, create a reusable method named random.
For this exercise, use the following method body:
@FXML private void random() {
    final double red = Math.random();
    final double green = Math.random();
    final double blue = Math.random();

    Color randomColor = Color.color(red, green, blue);
    colorArea.setFill(randomColor);
}
How the Random Color Works
Math.random() returns a random double value from 0.0 up to, but not including, 1.0.
JavaFX colors can be created using red, green, and blue component values in this same range.
For example:
Color.color(red, green, blue)creates a new color using the supplied red, green, and blue values.
A value near 0.0 means very little of that component is present. A value near 1.0 means a large amount of that component is present.
Because each call to Math.random() produces a separate random value, the method produces a different combination of red, green, and blue each time it is called.
The resulting Color object is passed to setFill, just as the predefined colors were earlier. The difference is that this time the Color was created at runtime rather than using a constant such as Color.RED.
Do not connect this method to a button in Scene Builder. You will call it from the keyboard event handler later in the exercise.
6. Change the Color Based on Where the Rectangle Is Clicked
Next, you will handle a Mouse Event.
Create a method named:
mouseColorChangeThis method should receive a MouseEvent because it needs information about where the user clicked.
The rectangle is 330 pixels wide. Treat it as three equal regions, each 110 pixels wide:
+----------------+----------------+----------------+
|      RED       |      BLUE      |     GREEN      |
|                |                |                |
+----------------+----------------+----------------+
0               110              220              330
The rectangle should behave as follows:
- Clicking from
0through110should make the rectangle red. - Clicking above
110through220should make the rectangle blue. - Clicking above
220should make the rectangle green.
A MouseEvent contains the position of the mouse when the event occurred. You can obtain the horizontal position with:
e.getX()This value is measured relative to the node that received the event. In this case, it tells you how far from the left side of the rectangle the user clicked.
Inside the method, create a constant for the width of one section:
final int sliceWidth = 110;Then use the mouse's X coordinate to determine which third of the rectangle was clicked and change the fill color accordingly.
Do not hard-code 220 separately. Use the sliceWidth value when calculating the second boundary.
In Scene Builder, connect the rectangle's On Mouse Clicked property to mouseColorChange.
7. Add a Border When the Mouse Enters the Rectangle
JavaFX controls and shapes can be styled using CSS. CSS stands for Cascading Style Sheets and is also commonly used to control the appearance of web pages.
JavaFX provides its own CSS properties for changing the appearance of JavaFX nodes.
For a Rectangle, the outline is called its stroke.
The following JavaFX CSS creates a black outline that is 5 pixels wide:
-fx-stroke: black;
-fx-stroke-width: 5;
When CSS is written directly on a JavaFX node, it is called an inline style. In FXML, an inline style could appear like this:
style="-fx-stroke: black; -fx-stroke-width: 5;"Java code can change the same style using the setStyle method.
Create a handler named:
addBorderWhen the mouse enters the rectangle, this method should:
- Apply the following style to
colorArea:
-fx-stroke: black; -fx-stroke-width: 5;- Change
resultLabelto:
Entered RectangleBecause this handler does not need information from the MouseEvent, it does not need a MouseEvent parameter.
In Scene Builder, connect the rectangle's On Mouse Entered property to addBorder.
8. Remove the Border When the Mouse Leaves
Create another handler named:
removeBorderThe border exists because an inline CSS style was added to the rectangle. Removing the inline style removes the border.
You can remove the style by setting the style string to an empty string:
colorArea.setStyle("");The method should also change resultLabel to:
Left RectangleIn Scene Builder, connect the rectangle's On Mouse Exited property to removeBorder.
At this point, moving the mouse into the rectangle should add the black border, and moving the mouse out should remove it.
9. Add Keyboard Controls
The final event handler will respond to keyboard input.
Create a method named:
keyColorChangeThis method must receive a KeyEvent because it needs to determine which key the user pressed.
A KeyEvent provides the key that caused the event. You can retrieve it with:
e.getCode()The result can be compared to constants from the KeyCode class.
For example:
e.getCode() == KeyCode.Rchecks whether the user pressed the R key.
Implement the following keyboard controls:
| Key | Result |
|---|---|
R | Change the rectangle to red |
G | Change the rectangle to green |
B | Change the rectangle to blue |
ENTER | Change the rectangle to a random color |
When R, G, or B is pressed, also change the label to:
Typed R
Typed G
Typed B
When ENTER is pressed, call your existing random() method rather than duplicating the random-color code. Then set the label to:
Typed ENTERUse an if/else if structure to check the different keys.
Keyboard Focus
Keyboard events are sent to the JavaFX node that currently has keyboard focus. Depending on the node to which you attach the keyboard handler, you may need to click inside the application before testing the keyboard controls.
In Scene Builder, connect the appropriate On Key Pressed property to keyColorChange.
10. Test the Application
Run the application and verify each of the following behaviors.
Action Events
- The Red button changes the rectangle to red.
- The Blue button changes the rectangle to blue.
- The Green button changes the rectangle to green.
- The label displays the correct message after clicking the Red, Blue, or Green buttons.
Mouse Events
- Clicking the left third of the rectangle makes it red.
- Clicking the middle third makes it blue.
- Clicking the right third makes it green.
- Moving the mouse into the rectangle adds a black border.
- Moving the mouse out of the rectangle removes the border.
- The label reports entering and leaving the rectangle.
Keyboard Events
Rmakes the rectangle red.Gmakes the rectangle green.Bmakes the rectangle blue.ENTERgenerates a random color.- The label displays the correct keyboard-event message.
Event Handler Summary
When finished, your controller should contain handlers with the following purposes:
| Method | Event Source | Purpose |
|---|---|---|
red() | Red button | Set the rectangle to red |
blue() | Blue button | Set the rectangle to blue |
green() | Green button | Set the rectangle to green |
random() | Called by keyColorChange | Set the rectangle to a random color |
mouseColorChange(MouseEvent e) | Rectangle click | Choose a color based on the mouse X coordinate |
addBorder() | Mouse enters rectangle | Add a black CSS stroke |
removeBorder() | Mouse leaves rectangle | Remove the CSS stroke |
keyColorChange(KeyEvent e) | Key press | Change the color based on the key pressed |
Notice that only handlers that need information from the event object receive an event parameter. mouseColorChange needs the mouse coordinates, and keyColorChange needs the key code. The other handlers do not need the event object and therefore do not include an unused event parameter.
Submission
Submit your completed:
exercise3.fxml
Controller.java
Your application should run using the provided driver class without requiring any changes to that class.