Lab 9: Final Project, Part II
Objectives
- Employ binary file input and output to read and write image files.
- Construct a non-trivial interactive graphical user interface with at least two windows.
- Handle exceptions in a robust and meaningful fashion.
Resources
- Here you will build on the repository used in lab 8.
- Video Introduction.
Overview
In this assignment you will build on the solution created for Lab 8. In addition to updating your solution based on feedback from your instructor, you will add support for a new custom binary image format, additional image transformations, and additional user interface elements to support the new functionality.
Assignment
This week you must implement the following functionality:
- Load and save images in the custom binary
.bmsoefile format. - Convert an image to a red-channel version
- Convert an image to a red/grayscale version
- Refactor the code for grayscale and photo negative transformations using a functional programming approach
- Create a second window (an additional stage) for entering filter parameters.
- The appropriate graphical user interface to support the operations listed above.
- Correct any issues identified in your previous submission, if your instructor has provided feedback to you in a timely manner.
All of your classes should be placed in a package whose name matches your MSOE username.
Details
Handler Methods
void red(ActionEvent event)— Handler for converting an image to red-channel only.void redGray(ActionEvent event)— Handler for converting an image so that every pixel on an odd numbered line contains only the red color data and every pixel on an even numbered line contains the grayscale representation of the color.void blur(ActionEvent event)— Handler for updating filter kernel values for blurring an image.1)void sharpen(ActionEvent event)— Handler for updating filter kernel values for sharpening an image.1)void apply(ActionEvent event)— Handler for applying a filter operation to an image.1)
Refactoring for Functional Programming
You must refactor your implementations of the grayscale() and negative()
so that they make use of a functional programming approach. This same
approach must be used in the implementations of red() and redGray().
You must implement the following method in the class that handle the action events for above transformations:
private static Image transformImage(Image image, Transformable transform) {
    // ...
}
This method applies the specified transformation to each pixel in the image to produce a transformed image. The second argument specifies the behavior of the desired transformation.
The Transformable interface is a functional interface. A functional
interface has a single method, and can therefore be implemented with a lambda
expression. The method, named apply(), must accept two arguments: the y
location of the pixel and its color. The method must return the color for
the pixel after the applying the transformation. You must specify
implementations of the Transformable interface for the grayscale,
red, redGray, and negative image transformations as lambda
expressions.
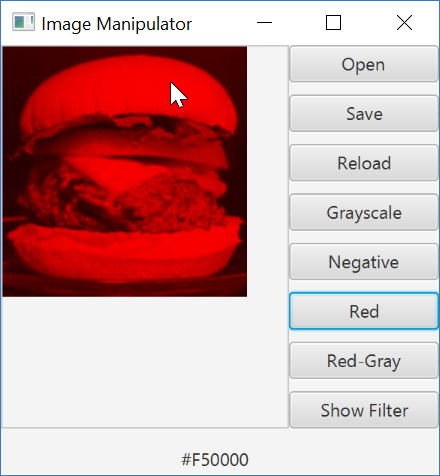
Red Only
This transformation acts as a red filter. The green and blue components of each pixel are set to zero.
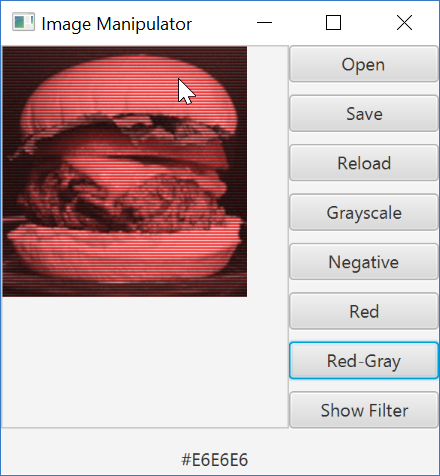
Red-Gray
This transformation is based on an experiment demonstrated by Edwin Land, founder of Polaroid, in 1959 more info. The experiment was based on the Retinex Theory of Color Vision. This page has a nice explanation of the experiment and the Retinex theory. The transform is quite simple: perform a Grayscale transformation on the pixels in alternating rows and perform a Red Only transformation on the pixels in the other rows2).
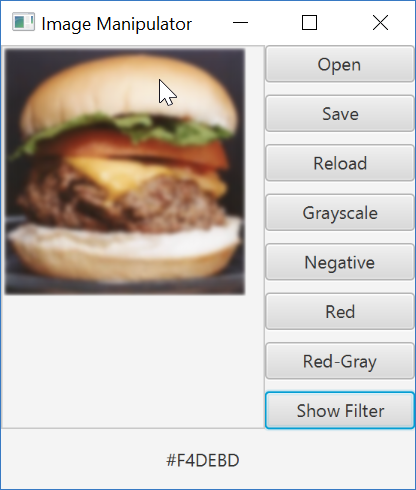
Filter Kernel Window
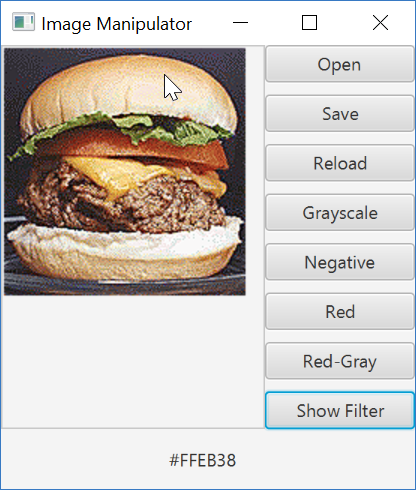
When clicked, the Show Filter button reveals a second window and changes the text on the button to Hide Filter. When Hide Filter is clicked, the second window is hidden, and the text on the button changes back to Show Filter. Note: you may chose an alternate user experience for this but must be able to justify why an alternate approach is superior to this.
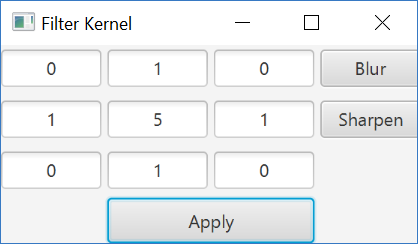
The Filter Kernel window contains a 3 x 3 grid3) of filter weights. The user must be able to modify these weights manually or by clicking the Blur or Sharpen buttons. When clicked, the Blur or Sharpen button on the right change the filter weights as follows:
Blur          Sharpen
0  1  0        0  -1   0
1  5  1       -1   5  -1
0  1  0        0  -1   0
The Apply button applies the filter kernel to the image. At a minimum, the button need only apply the filter kernel if the sum of the filter kernel weights is a positive value. For example, if the user enters 0 for all the filter weights, applying the filter can produce unpredictable results. The weights in the array specifying the filter kernel should sum to 1. Since the blur filter kernel has values that sum to 9 (0+1+0+1+5+1+0+1+0), each value must be divided by 9. The following code applies the Blur filter kernel:
double[] kernel = { 0.0,  1.0/9,  0.0,
                   1.0/9, 5.0/9, 1.0/9,
                    0.0,  1.0/9,  0.0};
Image blurredImage = ImageUtil.convolve(originalImage, kernel);
The values for filter kernel for Sharpen sum to 1 (5-1-1-1-1) so the weights in the array here would be:
double[] kernel = { 0.0, -1.0,  0.0,
                   -1.0,  5.0, -1.0,
                    0.0, -1.0,  0.0};
The Apply button must be disabled whenever an unsupported set of weights are entered in the window.
Loading and Saving Images
Your program must now support loading and saving .bmsoe files. Add the
following two methods to your ImageIO class and modify your read()
and write() methods to make use of these new methods when appropriate:
readBMSOE(Path path)— Reads an image file in.bmsoeformat.writeBMSOE(Image image, Path path)— Writes an image file in.bmsoeformat.
.bmsoe Binary Image Format
The custom .bmsoe file format is a binary based file format for storing
images. It is designed to be easy to load and save as well as produce smaller
file sizes than the .msoe format.
The file consists of a stream of binary data with the following header information:
- The characters
B,M,S,O,Eeach written as abyte. - The image width written as an
int - The image height written as an
int
The remainder of the file contains the pixel data. Each pixel is stored as a single integer value with bits 24-31 representing the alpha channel, bits 16-23 representing the red channel, bits 8-15 representing the green channel, and 0-7 representing the blue channel.
You may wish to add these two methods to your ImageIO class to facilitate
converstion between Color and int:
private static Color intToColor(int color) {
    double red = ((color >> 16) & 0x000000FF)/255.0;
    double green = ((color >> 8) & 0x000000FF)/255.0;
    double blue = (color & 0x000000FF)/255.0;
    double alpha = ((color >> 24) & 0x000000FF)/255.0;
    return new Color(red, green, blue, alpha);
}

private static int colorToInt(Color color) {
    int red = ((int)(color.getRed()*255)) & 0x000000FF;
    int green = ((int)(color.getGreen()*255)) & 0x000000FF;
    int blue = ((int)(color.getBlue()*255)) & 0x000000FF;
    int alpha = ((int)(color.getOpacity()*255)) & 0x000000FF;
    return (alpha << 24) + (red << 16) + (green << 8) + blue;
}
Your program should be able to load the specs.bmsoe image file in the
images folder of the repository.
Alpha Channel Complexities
You may find that some images appear all black when saved in the .bmsoe
format. This occurs when the original image does not have alpha channel
information. In that case, the saved images will have values of 0 for all
of the alpha channel values. You do not need to support saving such images.
Exception Handling
There are a number of situations that could cause your program to throw an exception. For example, if the file is not found, cannot be opened, or contains incorrectly formatted data, it is likely that an exception will be thrown. In these cases, the program should display an useful message and recover gracefully.
Just For Fun
There are many additional enhancements that could build on the required functionality. You are encouraged to enhance this application using your creativity. A number of enhancements are included below; however, you should not feel limited to these suggestions.
- Add a menu to the main window to replace (or in addition to) the buttons
- Apply a transform to only a selected region of the image
- Support saving
.bmsoeimages when the input image does not have alpha channel values. - Display the original and transformed images side-by-side
- Toggle between original and transformed images when mouse button is pressed on the image
- Create a meme generator by adding styled text on the image
- Tonal adjustment (e.g., adding a red hue to the image underneath the mouse)
- Provide undo functionality
- Implement additional transformations, e.g.
- Brighten
- Darken
- Decrease color saturation
- Increase color saturation
- Apply additional filters like the Edge filter see here
Acknowledgment
This laboratory assignment was developed by Dr. Chris Taylor.
2) This is a slight simplification from the actual transformation. You may chose to implement the actual transformation, if you choose to (you'll need to look it up). Be sure to indicate with a comment if you choose to do this.
3) You may choose to make a 5 x 5, 7 x 7, or 9 x 9 grid instead.