Lab 1: GitHub and FX and CheckStyle, OH MY!
Overview
This lab will give you the opportunity to learn how to use the various software tools we will be working with this term. You will be checking out assignment repositories from GitHub Classroom, creating new projects from those repositories in IntelliJ, and running the programs locally. You will also be using the CheckStyle plug-in to verify that all of your code conforms to the specifications for an MSOE program. When you submit your assignment by committing and pushing your local repository back to GitHub, your submission will be tested and a report will be generated.
Pre-Lab (DUE BEFORE LAB - see due date in Canvas)
For this lab, you must have all of the following software downloaded and installed:
- IntelliJ Community Edition
- Java 24 SDK
- Be sure to download and run the .MSI installer package and select all the default settings when asked
- JavaFX 24.02 SDK
Please note your laptops are running Windows 11 x64
Assignment
You will be given two separate repositories to check out, modify, and run. One will be a standard Java program, the other will be a JavaFX Graphical User Interface (GUI) program. Each requires a slightly different configuration in order to run.
For both repositories, you will be given a link by your professor. Follow that link and do the following:
- Accept the assignment. This will take you to another page.
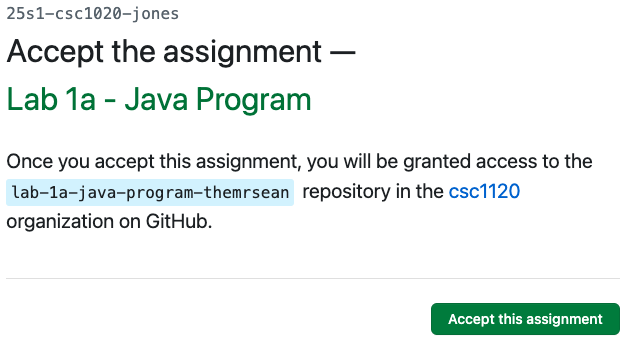
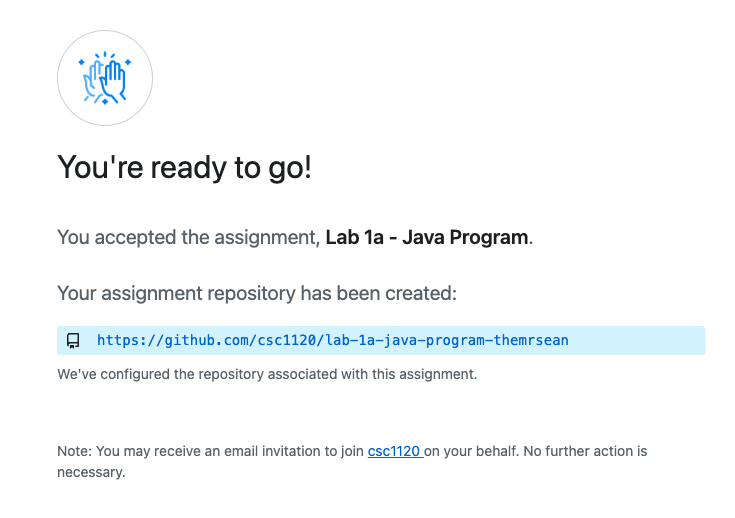
- Follow the GitHub link to your repository
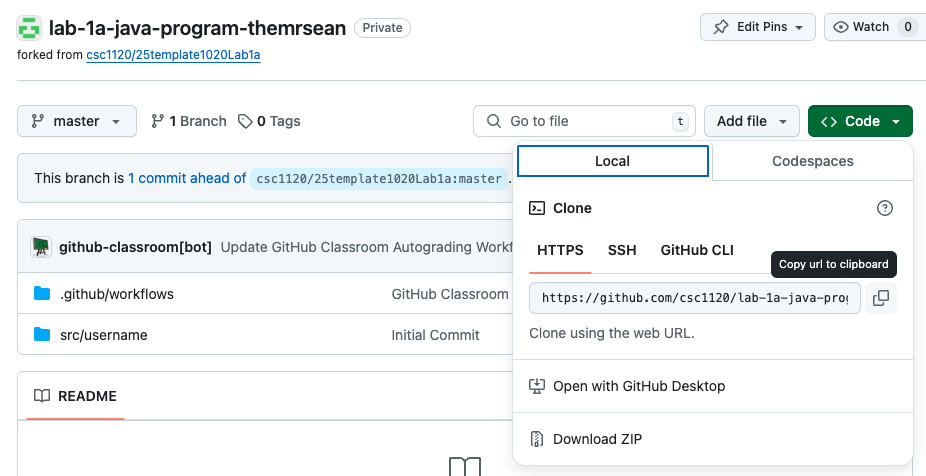
- Copy the GitHub URL
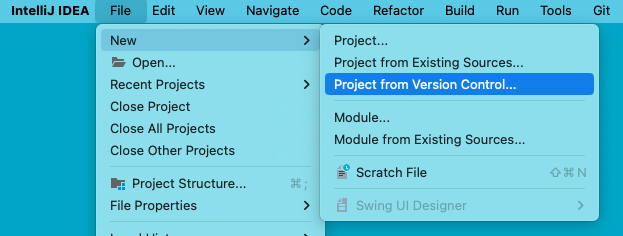
- In IntelliJ, in the File menu, select New->From Version Control and paste the GitHub URL here and select Clone.
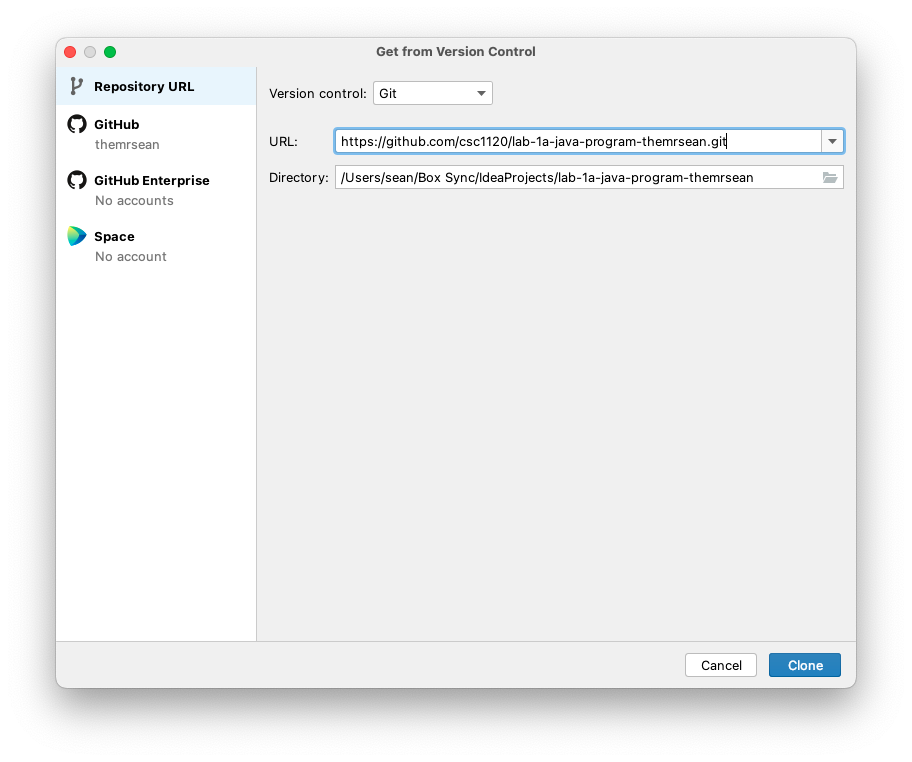 More details can be found here: Configuring/Using GitHub Classroom
Part 1
The first program is a text-based program that runs on the command line terminal of your machine. Run the program by right-clicking the Main class and selecting Run Main.main(). Whenever executing a program for the first time, you should use this technique to run the program.
You will sometimes be asked to submit you program in stages, such as after you have completed a certain portion of the assignment or at the end of a lab session, for example. What you will be doing is uploading the code you have written to GitHub, which keeps track of the changes you have made and when they were made. It also runs some basic tests on your code to verify you have written it correctly.
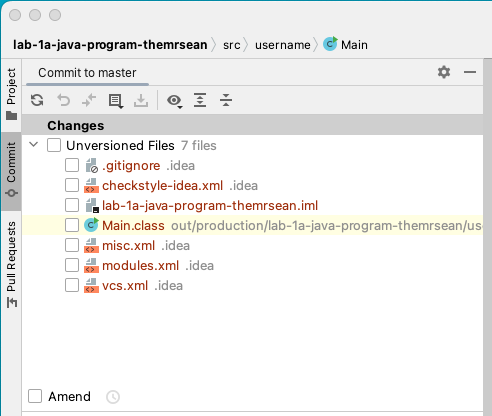
To submit your program, in IntelliJ, select the Commit tab on the left side of the Editor window and you will see a section for Changes that is currently empty. All of the files in the Unversioned Files section should NOT be added to your submission, so leave them unchecked (as they should currently be). Click back on the Project tab above the Commit tab to return to the default view.
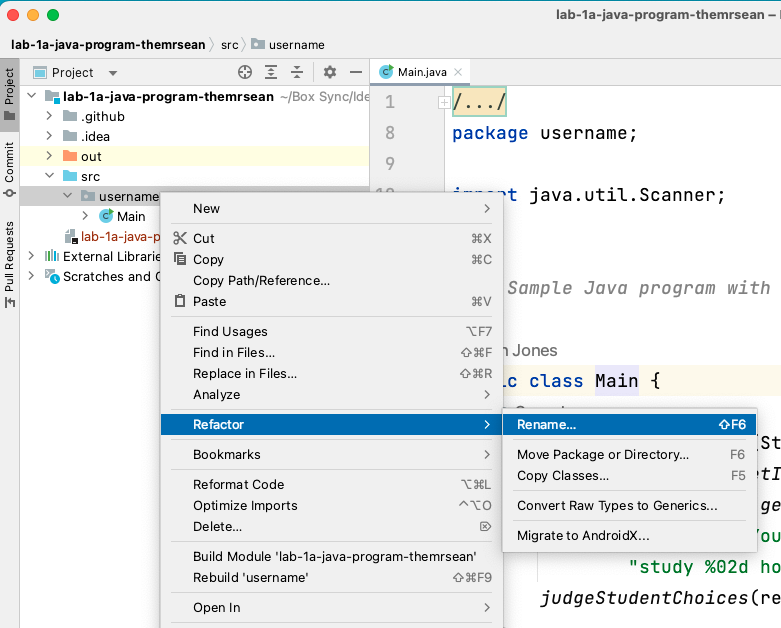
You will always be required to set the name of your package to your MSOE username, which is the same as your e-mail address (not including @msoe.edu). It must be all lowercase. If you have a hyphen in your last name, omit the hyphen when naming your package. The default package name when you first check out a repository will be username. To change the package name for the entire project, right-click on the package and select Refactor->Rename, then type in your username. You will notice the package declaration in Main.java has also been updated to your username package.
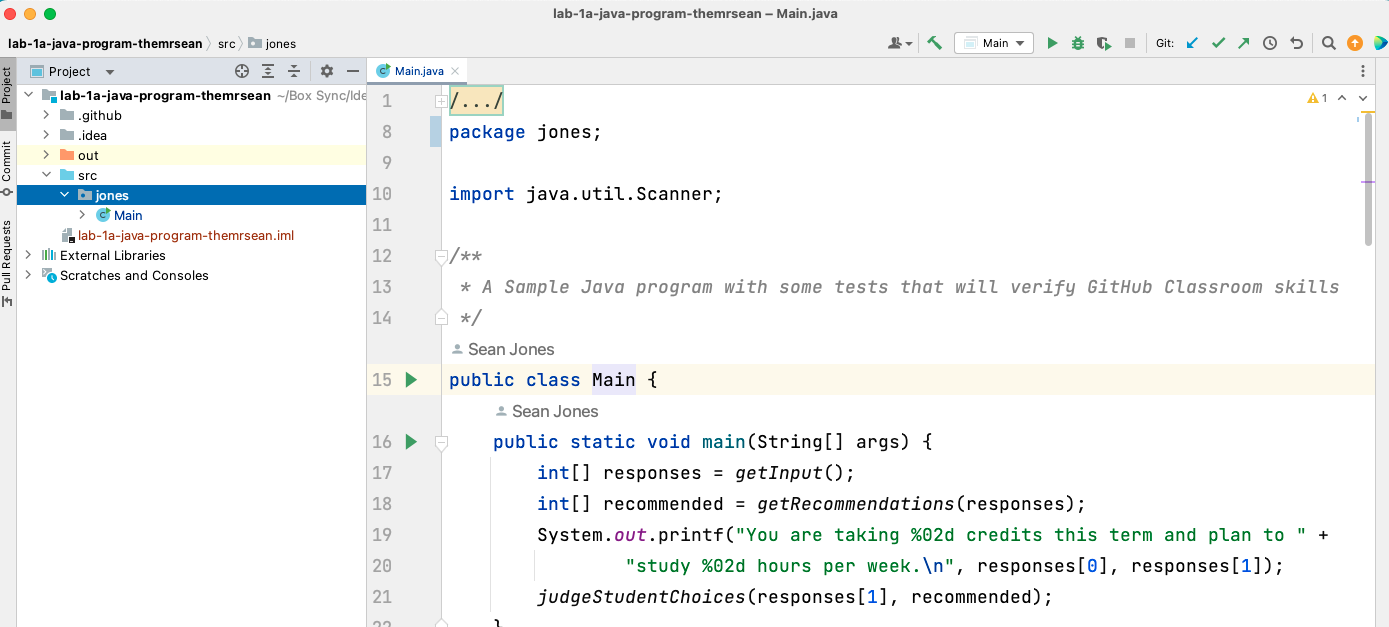
Go back to the Commit tab where you will see that Main.java has been added to the list of Changes. The files contained in Changes are the files we want to submit to the repository. Select the check box next to Main.java and type in a commit message below. This is an important step for both you and your professor to know what changes you made to the code. Once that is done, click on the Commit and Push... button to prepare the files for submission.
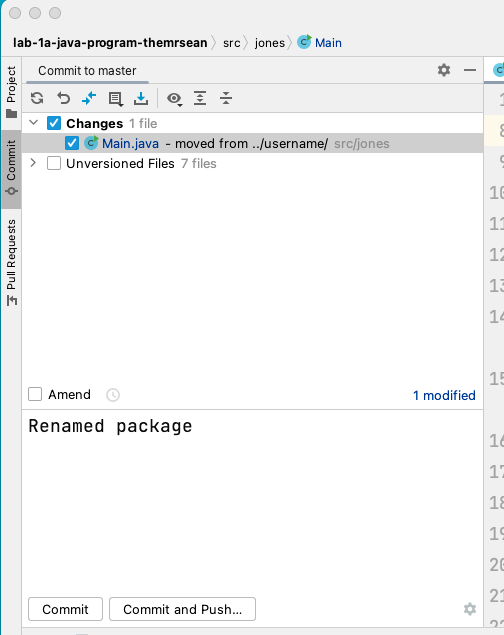
In this case, a warning will pop up, indicating there is a problem with the code. Go ahead and click on the Commit Anyway and Push... button, then click the Push button in the new window to push the code from your computer to GitHub.
Now that the code has been submitted to GitHub, go to your GitHub repository in your browser and click on the Actions tab. This is where the automated testing for your labs will be done and the reports will be generated.

If you followed the instructions so far, you should have a failed test, indicated by the red X next to your commit message.
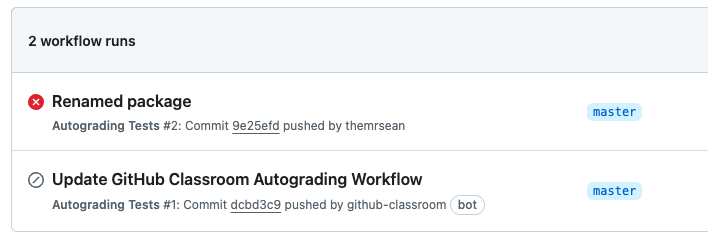
Click on the commit message to bring you to the test page then click on the run-autograding tests button to see the results of the tests. You will see that the submission failed on the CheckStyle test.
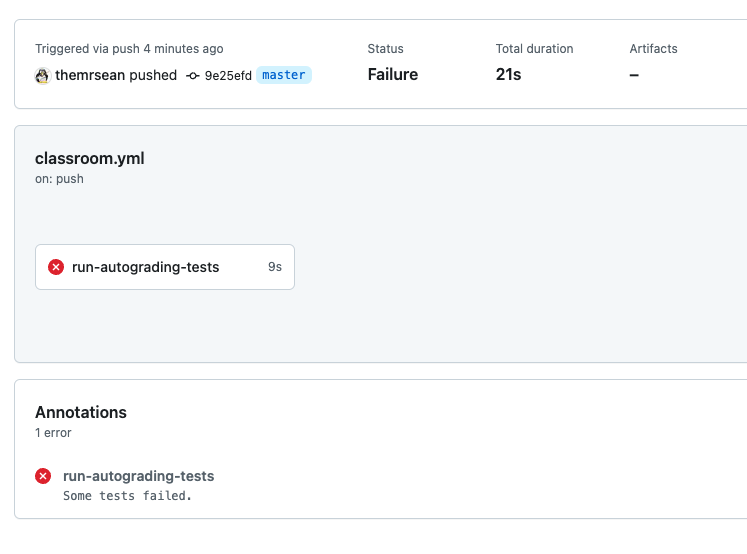
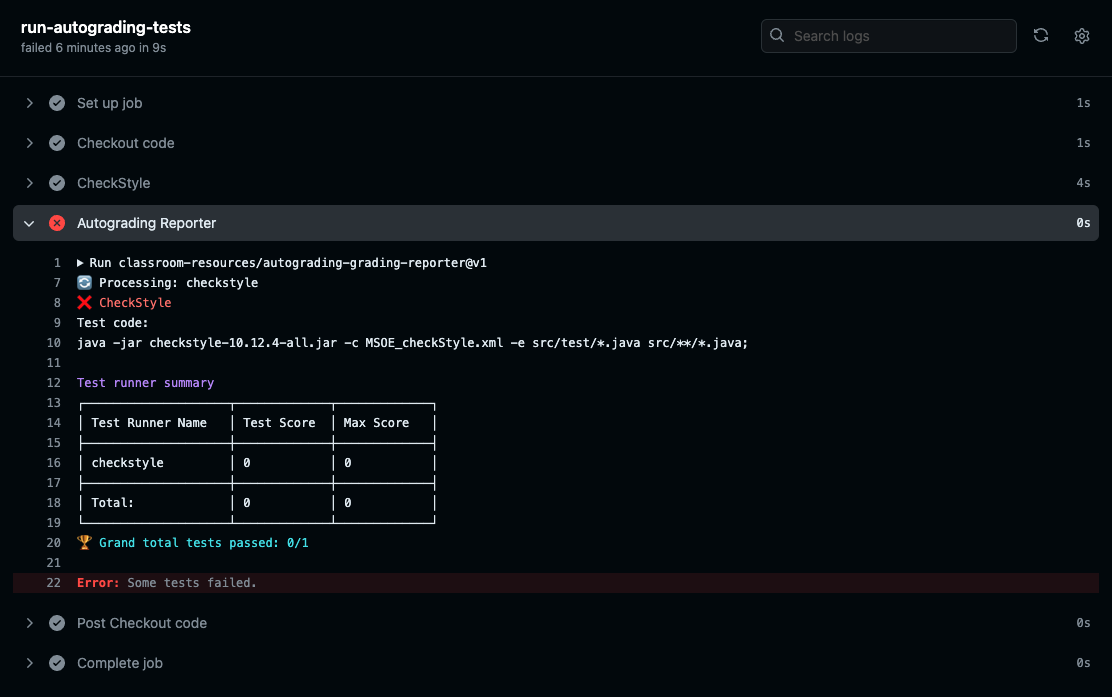
Click on the CheckStyle section above the Autograding Reporter to see what CheckStyle tests failed. Return to IntelliJ and fix the error shown in the report. Then repeat the steps above to Commit and Push... your project with the CheckStyle corrections completed. If you go back to the Actions in your repository, you should see a new test, this time with a green check mark next to it, indicating you passed all of the automated testing for the lab.


This is the process you will use whenever you submit a project. You will be expected to verify all the automated tests have been passed before your final submission.
Part 2
The second program uses the JavaFX library to create a Graphical User Interface (GUI) for the user to interact with. In addition to everything done in Part 1, the IntelliJ project will need some additional configuration to successfully execute the program and load the GUI.
Before cloning the repository for the second program, use the following tutorial to configure IntelliJ to be able to successfully run a JavaFX program.
Taylorials.com/Tools - Installing Java and JavaFX
Once this has been done, follow the same steps you used for the first program to create a new project, clone the repository, test the program, and push a project that passes all of the automated tests to GitHub.
Submission
Remove the dashes from the word D-O-N-E in the ReadMe.md files in both projects so they both contain the word DONE, then push both projects to GitHub with any necessary corrections so that both projects pass the automated CheckStyle tests.
Acknowledgment
This laboratory assignment was developed by Prof. Sean Jones.